The Best Fluffy Pancakes recipe you will fall in love with. Full of tips and tricks to help you make the best pancakes.
Table of Contents
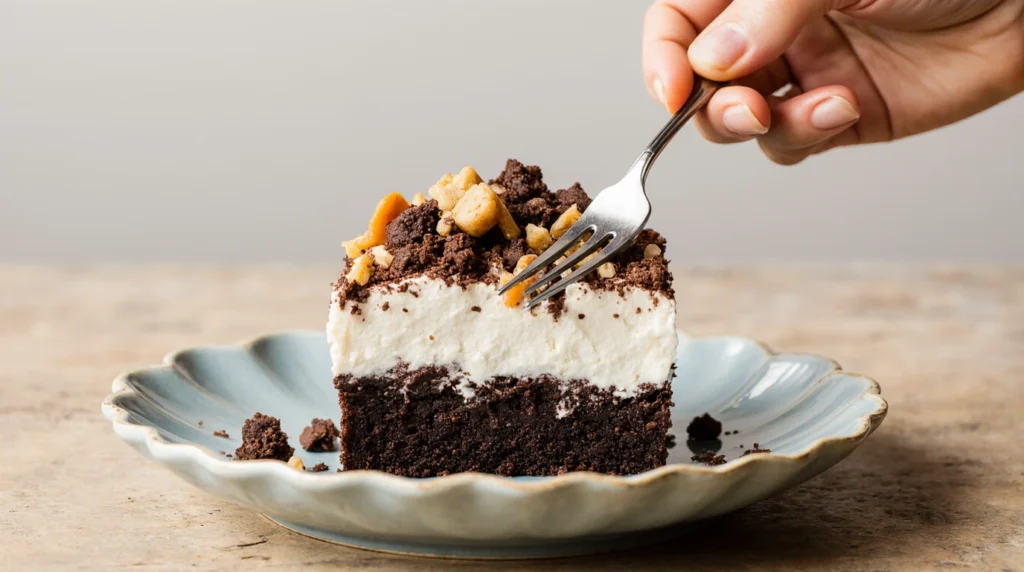
Butterfinger dessert with angel food cake is a light yet indulgent treat. Fluffy angel food cake meets the crunchy, chocolatey goodness of Butterfinger for a dessert that feels both airy and rich. It’s perfect for parties, family gatherings, or an easy sweet treat at home, and it always disappears fast. The first time I made it, it quickly became everyone’s favourite, with requests for the recipe before the night was over.
In this post, you’ll learn how to make this crowd-pleasing dessert step by step, using simple ingredients and easy techniques. Let’s get started!
If you loved thisIf you loved this Butterfinger Dessert with Angel Food Cake , you might also enjoy exploring a few other favorites on the blog. Try my Cherry Chip Cake Recipe.
Why You’ll Love This Butterfinger Dessert with Angel Food Cake
- Visual Appeal: The combination of the fluffy angel food cake with the crunchy, golden Butterfinger topping creates a stunning visual that will look incredible on any dessert table.
- Flavour Profile: This dessert balances the light, sweet flavour of angel food cake with the rich, chocolatey, peanut-buttery crunch of Butterfinger, making every bite a delight.
- Ease of Preparation: With simple ingredients and straightforward steps, this dessert is perfect for both novice bakers and seasoned chefs looking for a quick treat.
- Crowd-Pleasing Factor: Ideal for any occasion, from holiday baking to casual get-togethers, this dessert is sure to please both kids and adults alike.
Ingredients for Butterfinger Dessert with Angel Food Cake
Quality ingredients are key to achieving the best results in any recipe. When sourcing your ingredients, opt for fresh and high-quality items to ensure maximum flavor and texture.
- For the Angel Food Cake:
- 1 box of angel food cake mix (about 16 oz, or 450 g)
- 1 1/4 cups (300 ml) water
- For the Butterfinger Layer:
- 6 full-size Butterfinger candy bars, crushed
- 1/2 cup (120 ml) heavy cream
- 1/4 cup (50 g) unsalted butter
- For the Topping:
- 1 cup (240 ml) whipped cream
- 1/4 cup (30 g) chopped peanuts (optional)
How to Make Butterfinger Dessert with Angel Food Cake
Preheat the oven to 350°F (175°C) and lightly grease a rectangular baking dish.
In a large bowl, mix the angel food cake mix with water until smooth. Pour the batter into the pan and bake for 35–40 minutes, until the cake is light, fluffy, and lightly golden.

While the cake is in the oven, gently melt the crushed Butterfinger bars with the cream and butter in a saucepan, stirring until a smooth sauce forms.
Remove the cake from the oven and let it cool slightly. Use the handle of a spoon to make holes across the surface, then slowly pour the warm Butterfinger sauce over the cake so it soaks in.

Allow the cake to cool completely, then spread a thick layer of whipped cream on top. Add chopped peanuts if you want extra crunch.

Chill for at least two hours before slicing and serving. The result is a soft, airy cake filled with rich, candy flavour.
Expert Tips for Perfect Butterfinger Dessert with Angel Food Cake
- Patience Pays Off: Let the cake cool completely before adding any topping. A fully cooled cake keeps the whipped cream light and intact.
- Perfect Crunch: Crush the Butterfinger bars until you get small, even pieces. A food processor works well, but a rolling pin and sealed bag do the job too.
- Cream That Lasts: Whip the cream with a little powdered sugar to give it structure and a gentle sweetness.
- Party-Ready Tip: This dessert can be prepared ahead of time. Finish it with whipped cream just before serving for the best texture and freshness.

Creative Variations and Substitutions
- Double Chocolate Upgrade: Use a chocolate cake base instead of angel food cake for a deeper, more decadent dessert that highlights the Butterfinger flavour.
- Peanut Butter Boost: Spread a thin layer of peanut butter over the cake before adding the Butterfinger sauce for an extra nutty surprise.
- Gluten-Free Friendly: Choose a gluten-free cake mix to make this dessert accessible while keeping it just as tasty.
- Berry Brightness: Tuck fresh berries beneath the whipped cream to add a pop of colour and a light, fruity contrast.
How to Store and Freeze Butterfinger Dessert with Angel Food Cake
- Short-Term Holding: The dessert tastes best fresh, but it can sit out for about two hours if covered well to keep it from drying.
- Chilled Storage: Wrap the cake tightly or place it in a sealed container and refrigerate for up to three days.
- Freezing Option: For long-term storage, freeze the cake without the whipped topping. Keep it airtight for up to three months, then thaw overnight in the fridge before finishing with cream.
- Warming Tip: While it’s usually served cold, you can gently warm individual pieces in the microwave for 10–15 seconds if you like a softer, cosy bite.
Frequently Asked Questions About Butterfinger Dessert with Angel Food Cake
Can I use a homemade angel food cake?
Absolutely! Using a homemade cake adds a personal, comforting touch. Just make sure the cake has cooled completely before adding the Butterfinger layer otherwise, the candy sauce might melt and slide off. If you want, you can even lightly brush the cake with a simple syrup to keep it extra moist.
What if I can’t find Butterfinger bars?
Don’t worry! You can swap them for other crunchy chocolate-and-peanut-butter candies, or even crushed peanut brittle for a similar sweet and nutty crunch. Just keep in mind that different candies may change the texture slightly, but the dessert will still be delicious.
Can this dessert be made dairy-free?
Yes! Replace heavy cream and butter with coconut cream and a plant-based margarine or vegan butter. For the topping, use a dairy-free whipped cream. The result is just as rich and creamy, with a subtle coconut twist that pairs surprisingly well with the Butterfinger flavours.
How do I prevent the cake from sticking to the pan?
Greasing the pan is essential. Use butter or non-stick spray and, for extra assurance, line the bottom with parchment paper. This makes it easy to lift the cake out of the pan once it’s cooled and ensures clean edges when slicing.
Is this dessert suitable for holiday baking?
Definitely! Its golden cake, buttery candy sauce, and fluffy whipped topping make it a showstopper. Whether it’s for Christmas, birthdays, or summer gatherings, it’s a dessert that always draws compliments and disappears fast.