Table des matières
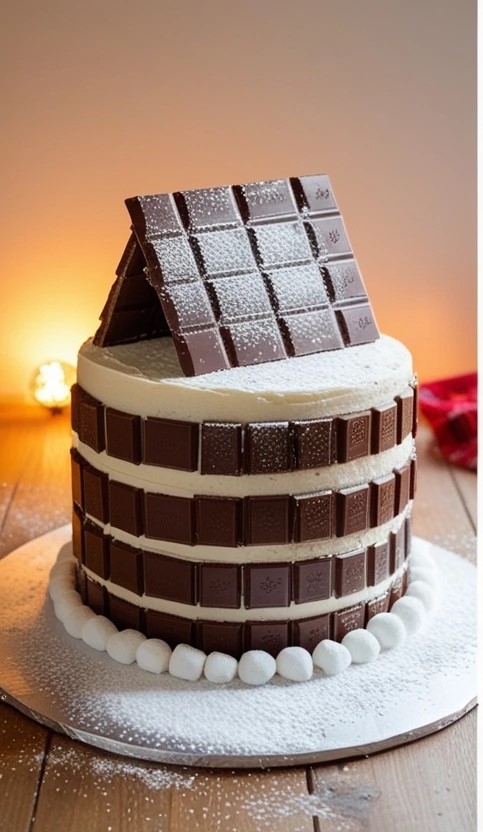
When the snow begins to fall, and the holiday spirit fills the air, nothing beats the warmth of home and the comfort of a decadent dessert. Picture yourself in a cozy mountain lodge, the scent of rich chocolate wafting through the air, and the anticipation of slicing into a cake that looks as inviting as a Swiss chalet. Welcome to the world of the Swiss Chocolate Chalet Cake—a stunning dessert that captures the beauty of winter and the luxury of Swiss chocolate all in one.
This chocolate cake is not just any ordinary cake; it’s a beautifully crafted dessert that mirrors the charm of a Swiss chalet, with layers of rich, moist chocolate cake and creamy, velvety frosting. Whether you’re hosting a festive gathering, celebrating a special occasion, or simply looking to indulge, this recipe will guide you through creating your chocolate masterpiece.
In this comprehensive guide, you’ll find everything you need to know to make your own Swiss Chocolate Chalet Cake, including tips for perfecting the recipe, decorating ideas, and answering frequently asked questions. Let’s dive into the delicious details!
To discover more chocolate delights, be sure to check out my recipes for: German Chocolate Poke Cake.
Why You’ll Love This Recipe
- Beautiful and Delicious :This Swiss Chocolate Chalet Cake is a treat for the eyes and the taste buds! The charming chalet design is perfect for celebrations, and the rich Swiss chocolate flavor makes every bite unforgettable.
- Perfect for Winter Gatherings : Whether Christmas, New Year’s, or a cozy family dinner, this cake adds a festive and warm touch to any occasion.
- Rich Chocolate Flavor : Made with high-quality Swiss chocolate, this cake has a smooth, velvety cocoa taste that’s hard to resist.
- Fun to Make : Building a Swiss chalet cake is a creative and enjoyable process, making it a great project to share with family or friends.
- Adaptable for Everyone : This recipe can be adjusted with easy gluten- and dairy-free options so everyone can enjoy it.
- A Crowd Favorite : The combination of its stunning look and unique taste makes this cake a hit at any gathering. Get ready for compliments and recipe requests!

Ingredients You’ll Need for Swiss Chocolate Chalet Cake
For the Cake:
- 2 ½ cups all-purpose flour (or a gluten-free flour blend)
- 1 ½ teaspoons baking powder
- ½ teaspoon baking soda
- ¼ teaspoon salt
- 1 cup unsweetened cocoa powder (preferably Swiss chocolate powder)
- 1 ½ cups granulated sugar
- 1 cup packed brown sugar
- 1 cup unsalted butter (or a dairy-free substitute like plant-based butter)
- 4 large eggs
- 1 cup whole milk (or dairy-free alternatives such as almond or oat milk)
- 1 cup hot water (or strong coffee for a deeper chocolate flavor)
- 1 tablespoon vanilla extract
For the Swiss Chocolate Buttercream Frosting:
- 2 cups unsalted butter, softened (or a dairy-free butter substitute)
- 4 cups powdered sugar
- 1 cup melted Swiss chocolate (cooled slightly)
- 2 teaspoons vanilla extract
- 2-4 tablespoons heavy cream (or a non-dairy alternative)
For Chalet Decoration:
- Swiss chocolate bars or chocolate wafer sticks to create the chalet structure
- Shredded coconut or powdered sugar for a « snowy » effect
- Mini marshmallows, sugar pearls, or edible snowflakes for extra decorative touches
How To Make Swiss Chocolate Chalet Cake
Step 1: Prepare the Cake Batter
Adjust your oven temperature to 350°F (175°C) and grease three 8-inch round cake pans. To guarantee that cakes let go effortlessly from the pan, grease the bottom of each pan by using parchment paper. Stir the flour, baking powder, baking soda, salt, and cocoa in a big bowl.
It also kills lumps that, if not well handled, may cause hydrogenation and will ensure the dry ingredients are well mixed, yielding a silky batter. In another bowl, beat the butter, granulated sugar, and brown sugar until light and fluffy at medium-high speed for 3 minutes. Beat in the eggs, one by one, making sure you mix well to incorporate each of them into the previous one.
Blend in the vanilla extract, continuing to beat until well combined. Add the dry ingredients to the butter mixture a little at a time, and always mix before adding the milk.
A general sequence followed with the dry material, half a portion of the liquid, and then more of the flour, finishing with the remainder of the dairy. Ensure you blend until the dry and wet ingredients have been incorporated; do not over-mix the batter, as this will make it challenging. Lastly, mix in the hot water (or coffee) and ensure you get a smooth batter for a better chocolate taste.
Step 2: Bake the cakes.
Pour the batter prepared into the three cake pans in equal portions. Bake the cakes for 25-30 minutes using a toothpick and ensure they come out clean – they are well baked. When done, transfer the pans to the wire racks to cool for roughly 10 minutes before frosting. Next, carefully transfer your cakes to a wire rack for fantastic cooling. Cooling the cake before icing is imperative because the frosting will immediately melt.
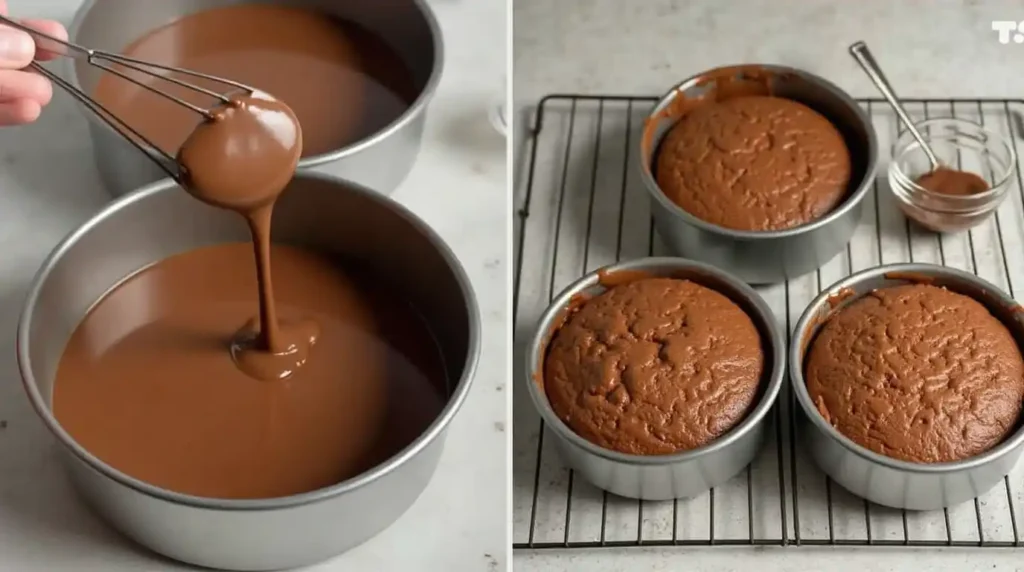
Step 3: Swiss Buttercream Swiss Chocolate
While the cakes are cooling, the buttercream frosting should also be made. Add the butter to the bowl with the softened butter and power an electric mixer to blend it until it is creamy. Stir in the powdered sugar cup by cup, always ensuring the mixture is creamy and not lumpy. Add the melted Swiss chocolate and vanilla extract when the sugar mixture has been mixed. Mix the ingredients until the mixture becomes light, stiff, and feathery. But if the frosting feels too thick to spread, add heavy cream or another dairy-free option one tablespoon at a time.

Step 4: Assemble the Cake Swiss Chocolate Chalet Cake
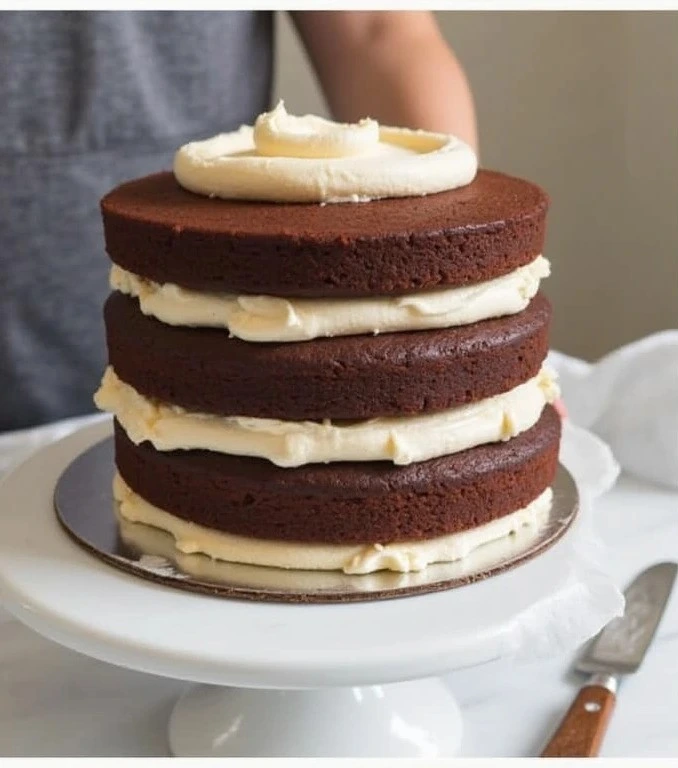
Once your cakes are completely cooled, it’s time to assemble the Swiss Chocolate Chalet Cake. Place the first cake layer on a stand or plate and generously spread buttercream frosting over it. Add the second layer and cover it with another layer of frosting.
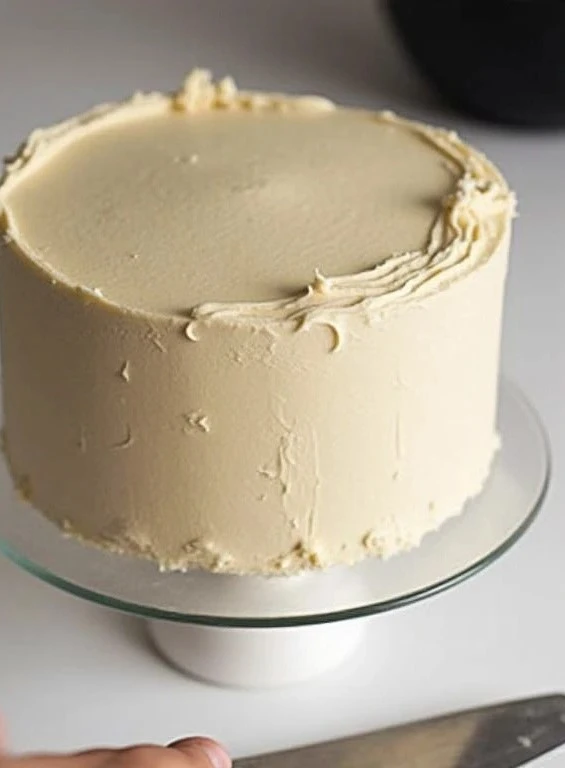
Finally, place the third layer on top and apply a thin coat of frosting, known as the crumb layer. This thin layer helps trap crumbs and provides a smooth surface for the final frosting. Refrigerate the cake for about 20 minutes to let the crumb coat set.
Once chilled, spread more frosting over the top and sides of the cake. Use an offset spatula to smooth everything out for a polished finish.
Step 5: Design the Chalet It’s easier than it sounds
Welcome to the second phase of cake decorating! This is where the fun begins. You’ll turn your cake into a cute Swiss chalet.
Use Swiss chocolate bars to build the chalet structure. Press and attach them along the sides of the cake. Place two chocolate bars on top, leaning them together to form an A-shaped roof.
Sprinkle shredded coconut or powdered sugar over the cake and chalet for a snowy look. Add mini marshmallows at the base as snowballs. Arrange edible sugar pearls to mimic icicles.

Hellpfull Tips
- Opt for premium Swiss chocolate: The key to this cake’s rich flavor lies in the quality of the chocolate. Choose a reputable Swiss brand to guarantee a smooth and luxurious taste. Avoid overmixing the batter, as it can result in a denser cake. Mix the ingredients until combined for a light, fluffy texture.
- Let the cake layers cool fully before applying the frosting: This is crucial to prevent the frosting from melting and sliding off the cake. Patience is critical to achieving a flawless, smooth finish. Refrigerate the cake after adding the crumb coat : This helps lock in crumbs and makes achieving a clean, polished final layer of frosting easier.
- Let your imagination run wild with your chalet design: While the classic look is to use chocolate bars for the walls and roof, feel free to use other edible decorations like gingerbread cookies, candy windows, or even piped chocolate details.
Storage and Reheating Instructions
Storage :
Room Temperature: If the cake is consumed within one day, it should be kept in an airtight container at room temperature. It is best if stored in a cool, dry place with no direct exposure to sunlight.
Refrigeration: To store for a more extended period, wrap the cake with a plastic wrap and keep it in the refrigerator. This product will only remain fresh for 4-5 days. Can it be served warm, or is it preferred to be served cold, or better still, at room temperature, as this determines the overall taste of the cake?
Freezing: To store for a long time, freeze it. Cover each slice or layer in plastic wrap, then freeze the whole thing in a freezer bag or container. It can be stored in the freezer for as long as two months. This cake can be stored in the refrigerator; however, to soften it, place it back in the refrigerator for several hours before serving.
Reheating:
Room Temperature: If the cake has been refrigerated, bring it to room temperature and allow it to unfreeze for about 1 up to two hours
Microwave (Optional for Individual Slices): Warm in the microwave on low for 10-15 seconds for a warm slice. Take care not to overcook; this will cause the frosting to liquefy.
Oven (For Unfrosted Cake Layers): To refresh the unfrosted layers, place the cake in the preheated oven at about 300°F (150°C) and cover it with foil; warm for about 5-10 minutes.
Frequently Asked Questions (FAQs)
How about avoiding gluten in this recipe?
Absolutely! In its place, you can use a good quality gluten-free flour of your choice for all-purpose flour given above. Ensure the blend has xanthan gum, or add 1 tsp to bind the ingredients well.
Can I make it without dairy?
This cake can be made dairy-free using vegetable butter instead of regular butter and almond or oat milk. The result is again more than sufficient in terms of richness and tactlessness and sinful as any good chocolate cake should be
How Should I Store the Cake?
Swiss Chocolate Chalet Cake may be kept in an airtight container in the refrigerator for not more than four days. For better outcomes, the cake must be brought to room temperature before serving as it brings out the best flavor and texture.
Can I Freeze the Cake Layers?
Yes! There are always instructions to bake and cool it, and if you wish to make the cake layers in advance, you have to wrap each layer with plastic foil and freeze it. To assemble the cake, thaw the layers on the countertop before frosting and decorating the cake.

the ultimate Swiss chocolate Chalet Cake
Equipment
- Mixing bowls (large and medium)
- Electric mixer or stand mixer
- Measuring Cups and Spoons
- Sifter
- Spatula and whisk
- Three 8-inch round cake pans
- Parchment Paper
- Wire cooling rack
Ingrédients
- ½ cups all-purpose flour (or a gluten-free flour blend)
- ½ teaspoons baking powder
- ½ teaspoon baking soda
- ¼ teaspoon salt
- 1 cup unsweetened cocoa powder (preferably Swiss chocolate powder)
- ½ cups granulated sugar
- 1 cup packed brown sugar
- 3 cup unsalted butter
- 4 large eggs
- 1 cup whole milk
- 1 cup hot water
- 1 tablespoon vanilla extract
- 4 cups powdered sugar
- 1 cup melted Swiss chocolate
- 2-4 tablespoons heavy cream
- Swiss chocolate bars or chocolate wafer sticks to create the chalet structure
Instructions
- Step : Prepare the Cake BatterAdjust your oven temperature to 350°F (175°C) and grease three 8-inch round cake pans. To guarantee that cakes let go effortlessly from the pan, grease the bottom of each pan by using parchment paper. Stir the flour, baking powder, baking soda, salt, and cocoa in a big bowl.It also kills lumps that, if not well handled, may cause hydrogenation and will ensure the dry ingredients are well mixed, yielding a silky batter. In another bowl, beat the butter, granulated sugar, and brown sugar until light and fluffy at medium-high speed for 3 minutes. Beat in the eggs, one by one, making sure you mix well to incorporate each of them into the previous one.Blend in the vanilla extract, continuing to beat until well combined. Add the dry ingredients to the butter mixture a little at a time, and always mix before adding the milk.A general sequence followed with the dry material, half a portion of the liquid, and then more of the flour, finishing with the remainder of the dairy. Ensure you blend until the dry and wet ingredients have been incorporated; do not over-mix the batter, as this will make it challenging. Lastly, mix in the hot water (or coffee) and ensure you get a smooth batter for a better chocolate taste.
- Step : Bake the cakes.Pour the batter prepared into the three cake pans in equal portions. Bake the cakes for 25-30 minutes using a toothpick and ensure they come out clean – they are well baked. When done, transfer the pans to the wire racks to cool for roughly 10 minutes before frosting. Next, carefully transfer your cakes to a wire rack for fantastic cooling. Cooling the cake before icing is imperative because the frosting will immediately melt.
- Step : Swiss Buttercream Swiss Chocolate While the cakes are cooling, the buttercream frosting should also be made. Add the butter to the bowl with the softened butter and power an electric mixer to blend it until it is creamy. Stir in the powdered sugar cup by cup, always ensuring the mixture is creamy and not lumpy. Add the melted Swiss chocolate and vanilla extract when the sugar mixture has been mixed. Mix the ingredients until the mixture becomes light, stiff, and feathery. But if the frosting feels too thick to spread, add heavy cream or another dairy-free option one tablespoon at a time.
- Step : Assemble the Cake Swiss Chocolate Chalet CakeOnce your cakes are completely cooled, it’s time to assemble the Swiss Chocolate Chalet Cake. Place the first cake layer on a stand or plate and generously spread buttercream frosting over it. Add the second layer and cover it with another layer of frosting.Finally, place the third layer on top and apply a thin coat of frosting, known as the crumb layer. This thin layer helps trap crumbs and provides a smooth surface for the final frosting. Refrigerate the cake for about 20 minutes to let the crumb coat set.Once chilled, spread more frosting over the top and sides of the cake. Use an offset spatula to smooth everything out for a polished finish.
- Step : Design the Chalet It’s easier than it soundsWelcome to the second phase of cake decorating! This is where the fun begins. You’ll turn your cake into a cute Swiss chalet.Use Swiss chocolate bars to build the chalet structure. Press and attach them along the sides of the cake. Place two chocolate bars on top, leaning them together to form an A-shaped roof.Sprinkle shredded coconut or powdered sugar over the cake and chalet for a snowy look. Add mini marshmallows at the base as snowballs. Arrange edible sugar pearls to mimic icicles.

