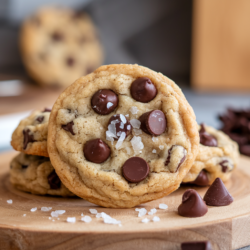
9 Steps for the Best Gluten Free Chocolate Chip Cookies by Rorie
Rorie’s Best Gluten-Free Chocolate Chip Cookies are a delicious twist on the classic American treat, crafted to be chewy, rich, and perfect for those avoiding gluten, without compromising on taste.
Ingrédients
- ½ cups Rorie’s gluten-free flour blend
- 1 teaspoon baking soda
- ½ teaspoon salt
- 1 cup unsalted butter, softened
- 1 cup granulated sugar
- ½ cup packed brown sugar
- 2 teaspoons pure vanilla extract
- 2 cups semi-sweet chocolate chips
Instructions
- Step 1: Preheat the OvenSet your oven to 350°F (175°C). Line two baking sheets with parchment paper or silicone baking mats to prevent sticking and promote even baking. This simple step ensures your cookies bake beautifully.
- Step 2: Prepare the Dry IngredientsIn a medium bowl, whisk together the following:This step ensures the baking soda and salt are evenly distributed throughout the flour, so your cookies bake up perfectly.2 ½ cups of Rorie’s gluten-free flour blend1 teaspoon baking soda½ teaspoon salt
- Step 3: Cream the Butter and SugarsIn a large mixing bowl, combine:Using an electric mixer, beat the mixture on medium speed for 2–3 minutes until it becomes light and fluffy. This process aerates the mixture, which helps your cookies rise and gives them a soft, tender texture.1 cup softened unsalted butter1 cup granulated sugar½ cup packed brown sugar
- Step 4: Add Eggs and VanillaTo the butter-sugar mixture, add:Beat well after each addition. The result should be a creamy, smooth mixture where the eggs are fully incorporated.2 large eggs, one at a time 2 teaspoons pure vanilla extract
- Step 5: Combine Wet and Dry IngredientsSlowly incorporate the dry ingredients into the wet mixture, stirring on a low setting until just combined. Scrape down the sides of the bowl as needed. Avoid overmixing the dough to prevent your cookies from becoming tough.
- Step 6: Fold in the Chocolate MagicGrab a spatula or wooden spoon and gently fold in 2 cups of semi-sweet chocolate chips. Take your time to distribute the chocolate evenly throughout the dough, ensuring that every bite is a delightful explosion of chocolatey goodness.
- Step 7: Chill the Dough (Optional but Recommended)Wrap your dough in plastic and let it rest in the fridge for at least 30 minutes. Chilling is your secret weapon—it solidifies the fats, minimizes spreading during baking, and allows the flavors to meld into something spectacular.
- Step 8: Scoop the DoughUse a cookie scoop or tablespoon to shape the dough into smooth, rounded balls. Place them on the prepared baking sheets, leaving about 2 inches of space between each cookie to allow room for spreading.
- Step 9: BakeBake in the preheated oven for 10–12 minutes, or until the edges are golden brown and the centers look just set. If you prefer softer cookies, remove them from the oven slightly earlier for that gooey cente
- Step 10: Cool and EnjoyAfter removing the cookies from the oven, let them sit on the baking sheet for five minutes. Then, transfer each cookie to a wire rack to cool down fully, ensuring they set perfectly.