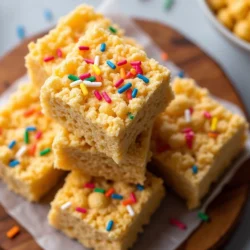
Gluten Free Rice Krispies Treats
Gluten-Free Rice Krispies Treats are a quick and easy dessert made with gluten-free rice cereal, gooey marshmallows, and butter. These chewy, sweet treats are perfect for satisfying cravings, entertaining guests, or enjoying a nostalgic snack—all while being friendly to gluten-free diets!
Ingrédients
- Gluten-free rice cereal
- Marshmallows
- Butter or dairy-free alternative
- Optional mix-ins: Chocolate chips, sprinkles, or nuts
Instructions
- Step 1: Melt the Butter and MarshmallowsStart by grabbing a large, heavy-bottomed pot. Melt the butter over low heat, stirring gently as it softens. Once melted, add your marshmallows. Keep the heat low and stir continuously—this ensures the marshmallows melt evenly into a velvety, gooey mixture. The key is patience; rushing this step can result in uneven texture
- Step 2: Add the CerealRemove the pot from heat and immediately pour in your gluten free rice cereal. Using a sturdy spatula, fold the cereal into the marshmallow mixture. Keep mixing until every piece of cereal is fully coated. Don’t worry if it looks messy—this is part of the fun!
- Step 3: Press Into the PanGrease a square baking pan (or line it with parchment paper for easy removal). Transfer the sticky cereal mixture to the pan. Use a spatula, the back of a spoon, or wax paper to press it down firmly and evenly. Aim for a compact, level layer, but don’t compress it so much that it loses its signature chewiness
- Step 4: Let It SetThe hardest part? Waiting! Leave the pan at room temperature for 30 minutes to cool and set. Once firm, use a sharp knife to slice your treats into squares. Voilà—your Gluten Free Rice Krispies Treats are ready to enjoy!These steps are simple enough for anyone, even kids, to follow. Plus, they make cleanup a breeze—just one pot and a pan! Grab a square and savour the chewy, marshmallow goodness you just created.
Notes
- Use Fresh Marshmallows : This might seem like a small detail, but trust me, it’s huge. Stale marshmallows? They’re clumpy, resistant to melting, and can leave you with a gloopy mess. Fresh marshmallows, on the other hand, melt into a smooth, luscious goo that evenly coats every piece of cereal. Pro tip: If your marshmallows have been sitting in the pantry for a while, do a quick squish test—if they’re firm or dry, it’s time for a new bag.
- Work Quickly : The moment your marshmallows are melted and mixed with butter, it’s go-time! This sticky, magical mixture sets faster than you might expect. Quickly stir in your cereal until everything is evenly coated, then immediately transfer it to your prepared pan. No time to second-guess yourself—it’s all about speed and confidence! If you hesitate, the mixture might start to harden, making it trickier to spread.
- Grease Everything (Seriously, Everything) : Let’s face it: marshmallows are basically sugar glue. If you don’t grease your tools (and maybe even your hands), you’ll find yourself wrestling with the mixture. A little butter or oil on your spatula, the sides of your pot, or even your fingers can work wonders. Bonus tip: Grease a sheet of parchment paper to press the mixture into the pan cleanly and evenly—it’s a game-changer.